/HubSpot%20-%20eBook%20-%20Proof%20Card%20Mockup%20001.jpg?length=1000&name=HubSpot%20-%20eBook%20-%20Proof%20Card%20Mockup%20001.jpg)
/HubSpot%20-%20eBook%20-%20Proof%20Card%20Mockup%20001.jpg?length=1000&name=HubSpot%20-%20eBook%20-%20Proof%20Card%20Mockup%20001.jpg)
/HubSpot%20-%20eBook%20-%20Proof%20Card%20Mockup%20001.jpg?length=1000&name=HubSpot%20-%20eBook%20-%20Proof%20Card%20Mockup%20001.jpg)
/HubSpot%20-%20eBook%20-%20Proof%20Card%20Mockup%20001.jpg?length=1000&name=HubSpot%20-%20eBook%20-%20Proof%20Card%20Mockup%20001.jpg)
/HubSpot%20-%20eBook%20-%20Proof%20Card%20Mockup%20001.jpg?length=1000&name=HubSpot%20-%20eBook%20-%20Proof%20Card%20Mockup%20001.jpg)
/HubSpot%20-%20eBook%20-%20Proof%20Card%20Mockup%20001.jpg?length=1000&name=HubSpot%20-%20eBook%20-%20Proof%20Card%20Mockup%20001.jpg)
/HubSpot%20-%20eBook%20-%20Proof%20Card%20Mockup%20001.jpg?length=1000&name=HubSpot%20-%20eBook%20-%20Proof%20Card%20Mockup%20001.jpg)

/HubSpot%20-%20eBook%20-%20Proof%20Card%20Mockup%20001-min.jpg?length=1000&name=HubSpot%20-%20eBook%20-%20Proof%20Card%20Mockup%20001-min.jpg)

If you're in the market to build a knowledge base for your organization, but maybe don't have the budget or resources for specialized software - I'll show you how I designed one using Viva Engage and a SharePoint Team Site.
Download our comprehensive Viva Engage Guide to learn more about best practices and use cases.
This article is for you if your organization currently lacks a system for capturing, organizing and maintaining staff resources (i.e.: onboarding and training content) into a single source of truth.
Step #1: Assemble Your Team
Before building anything, you're probably going to need some help. Like any good IT project, these are the roles that will be critical to helping launch and run the knowledge base.
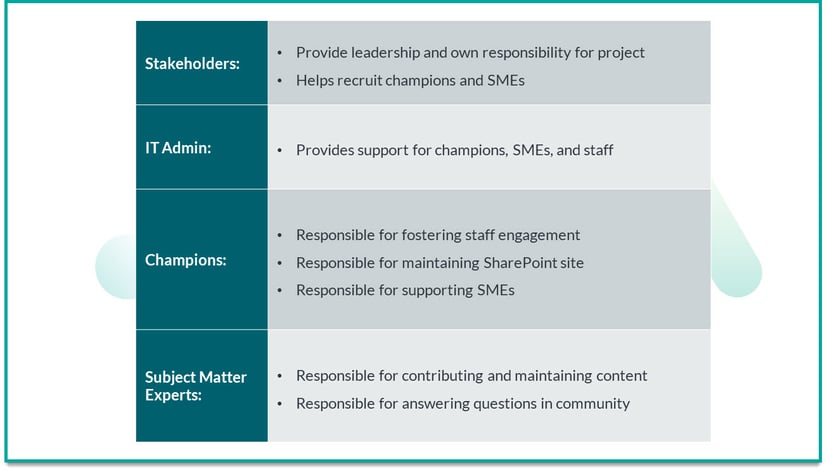
The Stakeholders
Unless you're in a CTO or CEO role, you'll probably need buy-in from your executive leadership. In other words, you need stakeholders on this project to ensure you have the support needed to (1) launch the knowledge base, and (2) maintain it for the long-term.
Your stakeholders can also help appoint staff members to be your champions and subject matter experts. The people who will help contribute content, answer staff questions and help improve the knowledge base over time.
The Champions
What happens when someone goes to your knowledge base for a piece of information, but can't find it? Or what happens when they find the document or article they're looking for, but it's out of date and not representative of your current practices?
- They'll message a co-worker to ask for help, and...
- They may lose confidence in your knowledge base as a reliable resource.
What if you had a few staff members who were authorized to commit a few hours a month to the knowledge base? These are your champions.
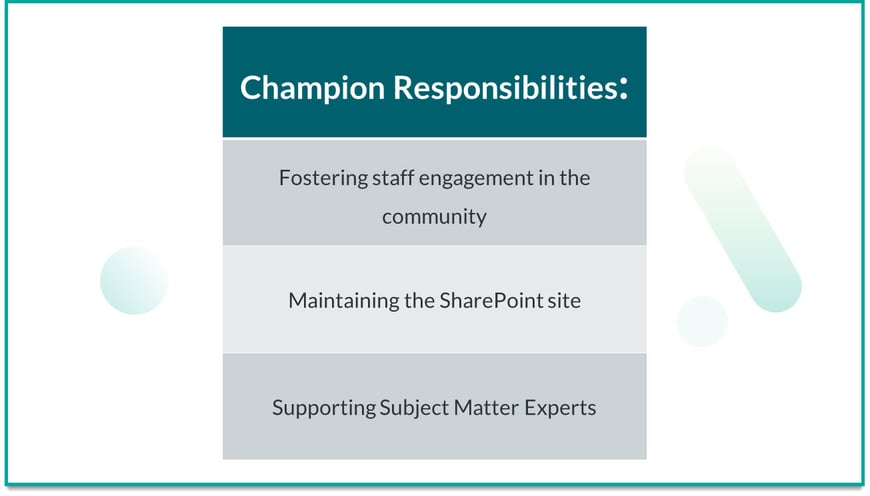
In my setup, the champions are also assigned to be group owners. This gives them the authority to properly manage the site and community with minimal support from IT.
More importantly, your champions will be the first-line response to questions and comments posted to the community. Whether it's helping answer questions, sharing new resources, or connecting staff with subject matter experts - having people that are able to respond to people in a timely manner is essential to building a people-driven knowledge base.
Champions will also be responsible for ensuring the site and it's contents are well-maintained, promoting new/updated resources, but they are NOT the content owners. The content owners are the departments, and their designated subject matter experts.
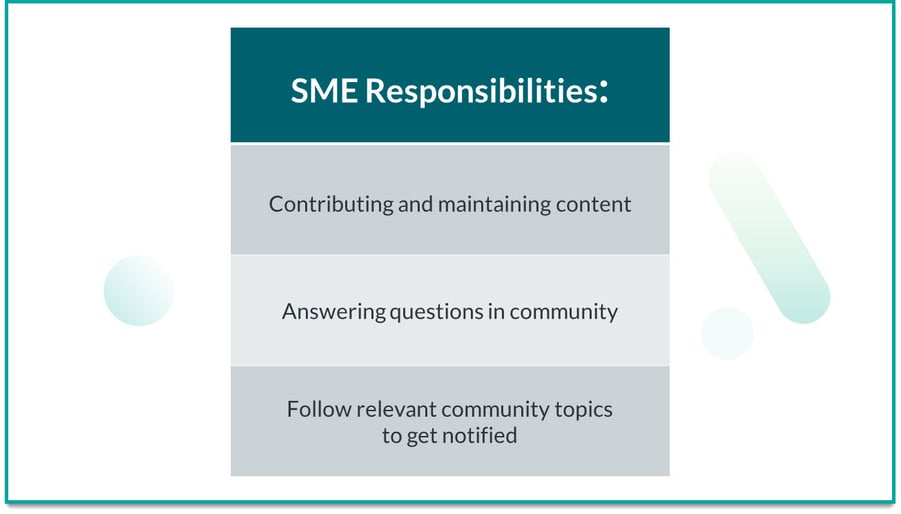
Subject Matter Experts (SMEs)
A knowledge base is only as strong as its content. To have quality content, you will need the help of SMEs from across the organization to help provide resources, answer questions and help maintain existing content.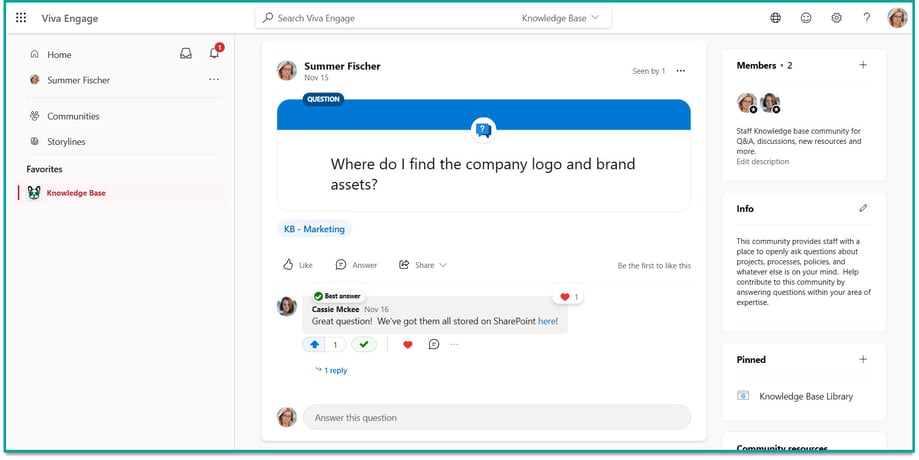
Champions should not be expected to know everything about the business. Having SMEs to connect with will help get questions answered quickly, and can also help identify areas to improve knowledge base content.
In my setup, SMEs are group members to ensure they're looped into community activity. Additionally, they'll have special permission to submit and maintain content on the site's knowledge base document library.
After you've assembled your team and kicked-off the project, it's time to start building!
Step #2: Create the Community and Group
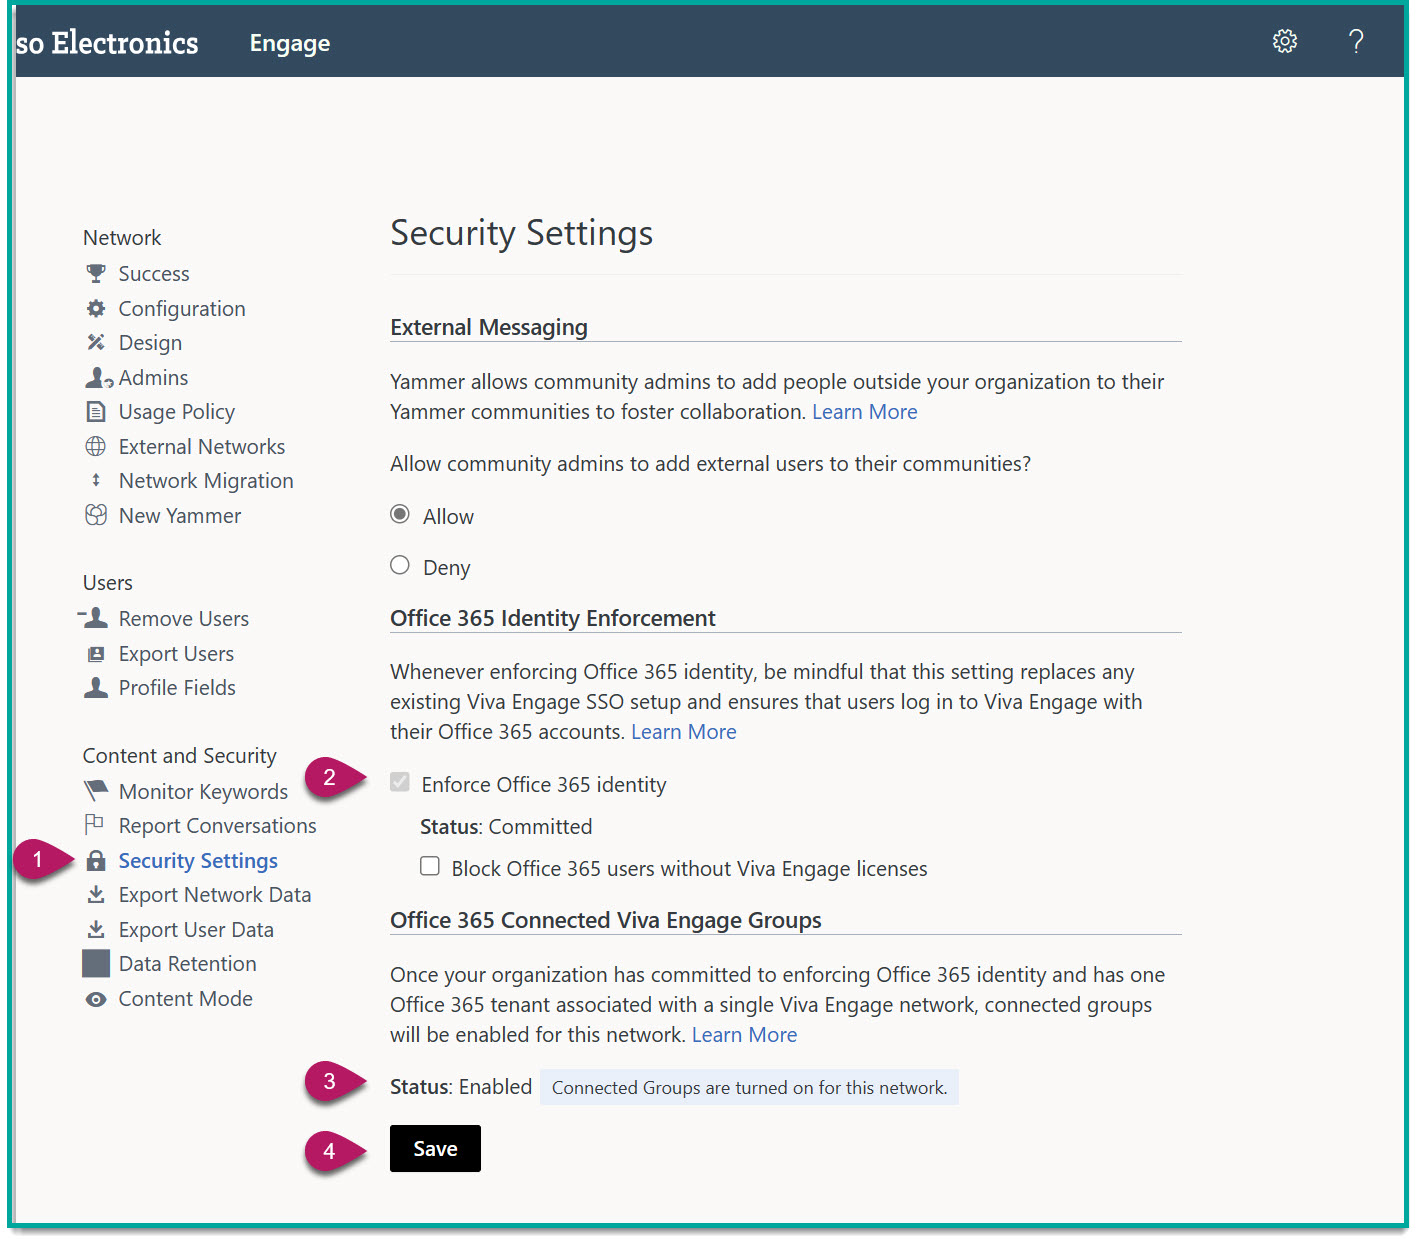
First things first, this setup leverages Microsoft 365 groups. If you've never used Viva Engage in your tenant, you'll need to make sure that this functionality is enabled before you make your first community.
Once complete, go to Viva Engage and create the community.
Alternatively, you can create it from Orchestry using our Viva Engage template.
Your group should be set to public so staff can discover it later. However, if you're concerned about staff accessing it early, you can make it private to start, and change it to public when you're ready to launch it.
Here's how I would approach setting up the group:
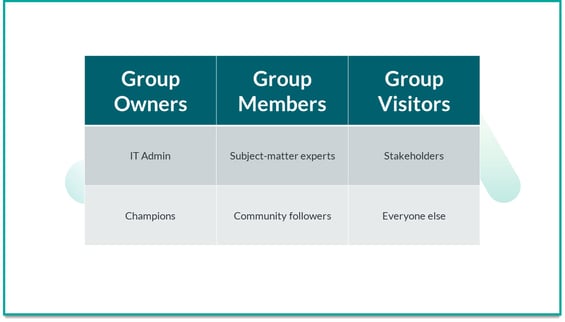
While the IT team will be providing a supporting role, the knowledge base should be owned by the people who have the interest to see it succeed. By assigning champions as group owners, you can give them the tools they need to ensure site content is up to date, community questions are being answered in a timely manner.
Your subject matter experts should be invited as group members so they are notified when new questions are posted. If nothing else, they should be following community topics that are in their wheelhouse.
Anyone that joins/follows the community will become group members. This will allow them to get notified when new activity happens in the community. Everyone else will automatically be in the group visitor bucket. Staff members don't need to join the public group to participate in the community or access the knowledge base resources on SharePoint.
While it might be tempting to start setting up the community immediately after it's provisioned, we will come back to it later.
First things first, we need to setup the SharePoint site.
Step #3: Setup the SharePoint Site
This site will serve at your actual knowledge base. For this concept, we'll assume you are starting from scratch and do not have a system or site to organize your organizations resources.
I'm also going to assume you have experience setting up SharePoint sites here too. The difficulty of this setup is probably a 4/10 but if you've new to SharePoint, I would recommend reaching out to us for custom solutions and insights.
With that out of the way, the first things we'll do in your new SharePoint team site is setup a new document library for your knowledge base content.
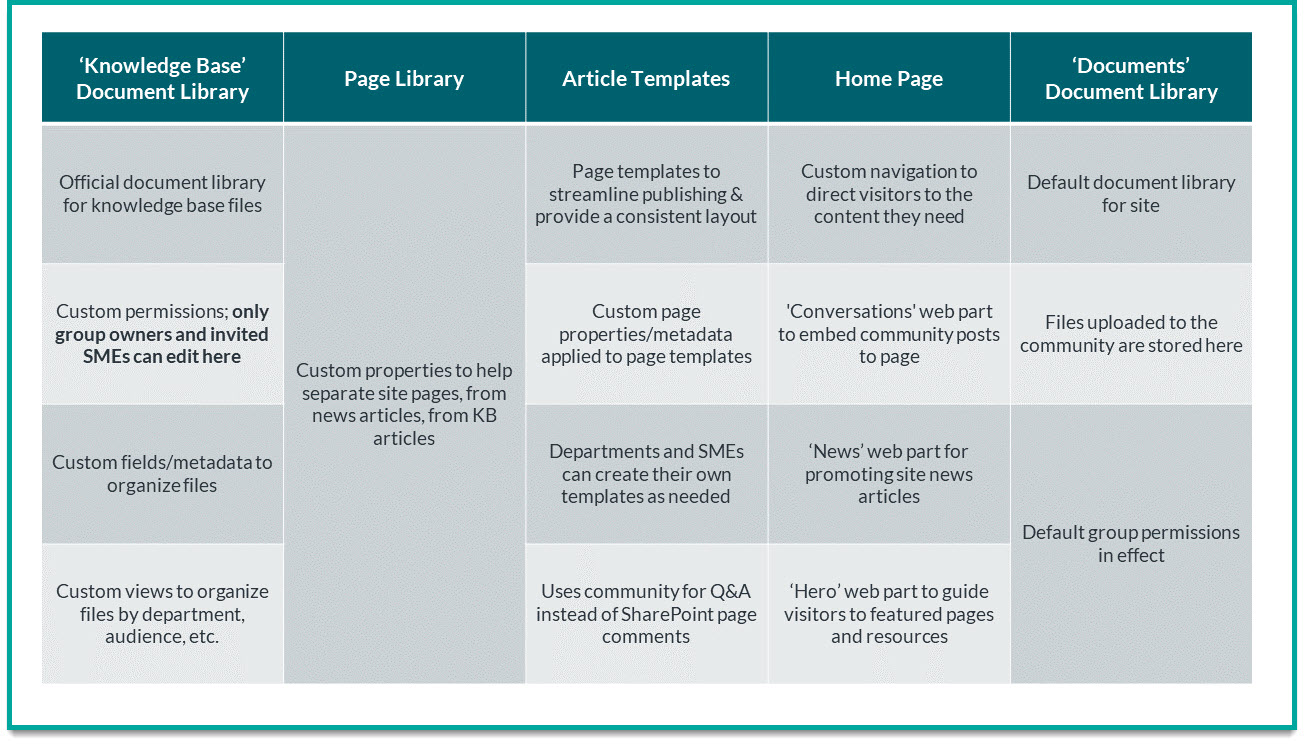
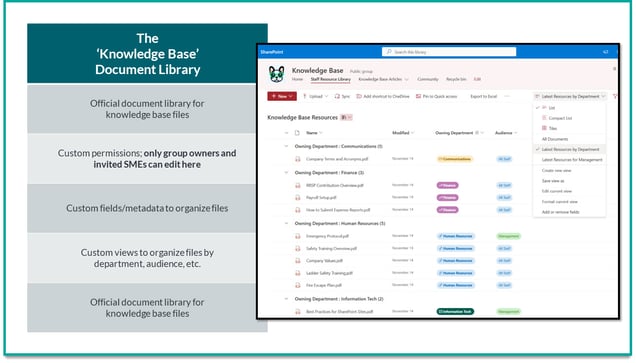
The Knowledge Base Document Library
Anyone who joins the community will become a group member. This will give them edit permissions to the site and the 'Documents' document library.
Instead of trying to manage permissions at the file or folder level, create a new document library called "Knowledge Base Files' (or anything along those lines). In this scenario, it's better to manage permissions at the library level.
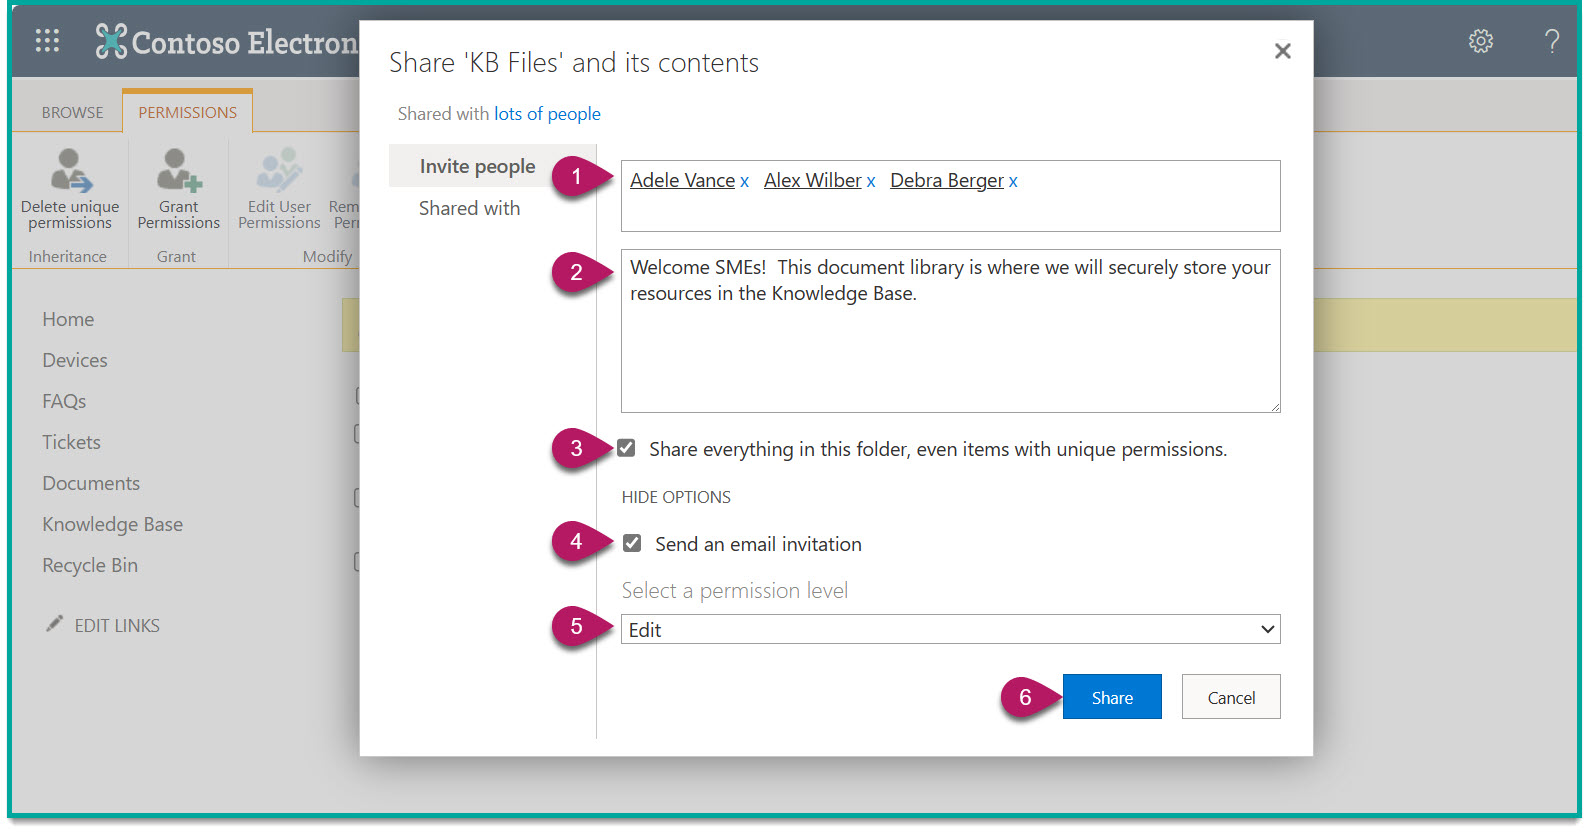
To protect your knowledge base files from being modified by anyone that isn't a champion or SME:
- go into the SharePoint library permissions,
- break the inherited group permissions, and
- change the group member permissions to 'READ'.
Next, invite your SMEs directly to the library, and give them EDIT access.
Back in the KB document library, I encourage you to add custom fields.
While past file-management practices taught us to use folders to organize content and manage access to said files - SharePoint works differently.
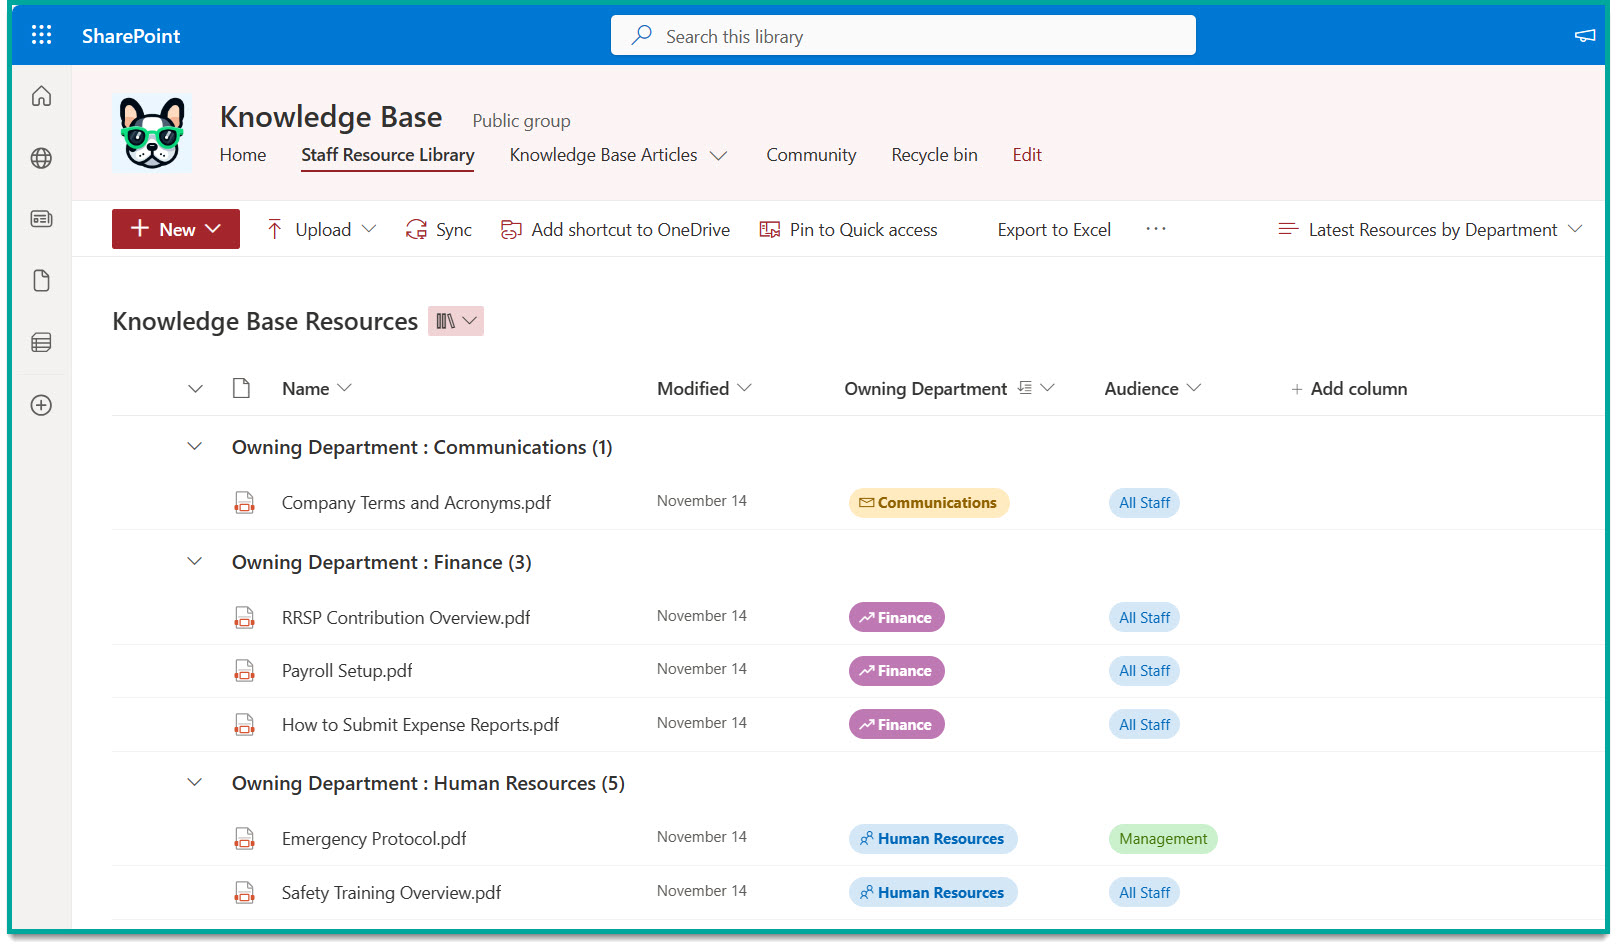
By adding custom fields to the library, we open up new methods navigating files. For example, in my test site, I added fields that help me track:
-
who owns the content (owning department)
-
who the content is for (audience)
Those are just examples of what you can add to your own library to organize the content for end users and SMEs. Custom fields help us create views that we can use to quickly sort, group and filter files, so our end users can find what they're looking for quickly.
As a bonus, library metadata helps prepare your organization for the AI tools you may want to use in the future.
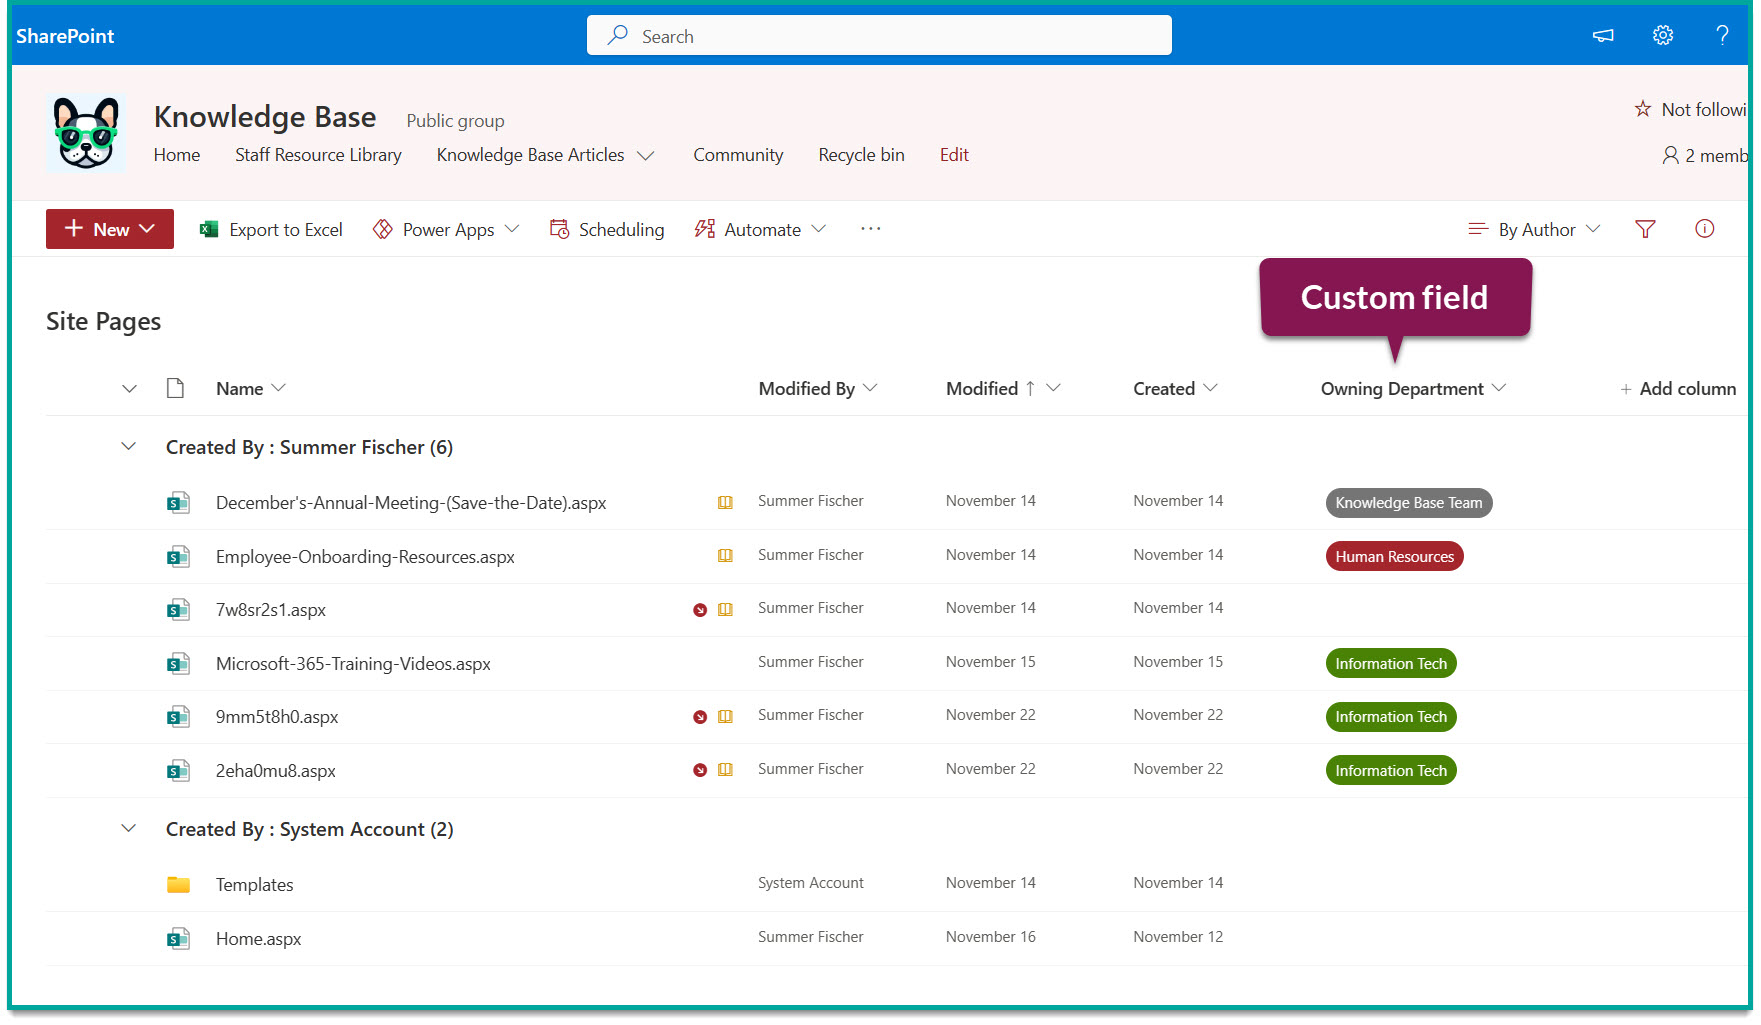
The Page Library
Just like the document library, custom fields can help you manage your site pages. This is especially important if you plan to use pages for site news, KB articles or anything beyond typical site navigation.
Article Templates
Even if the bulk of your knowledge base are simple files stored in the document library, your SMEs may want to leverage site pages to help publish and promote that content. Creating page templates for them can help:
-
Streamline the publishing process for SMEs with limited experience with SharePoint
-
Ensure content is published in a consistent format, making it easier for readers to read and learn
-
Ensure the appropriate page properties/metadata is applied to pages before they're published
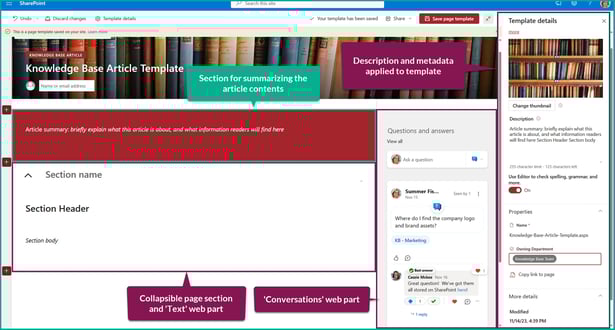
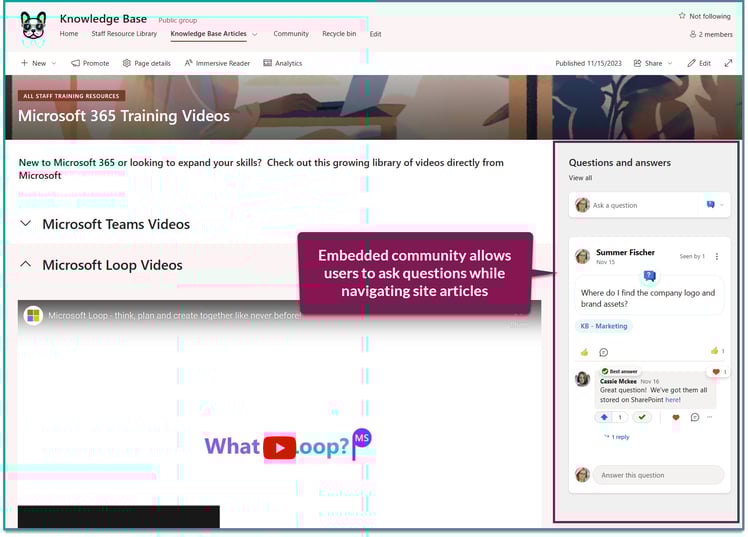
In my setup, I included the 'Conversations' web part in my templates so readers would know exactly where to ask a question if they found something unclear.
Talk to your SMEs and colleagues to find out what they would find helpful in a page template.
The Home Page and Navigation
The SharePoint site will look like any out-of-the-box team site.
As this is your company's knowledge base and people need to be able to find the information they're looking for quickly - I strong recommend you put some time and thought into setting up the site home page and navigation.
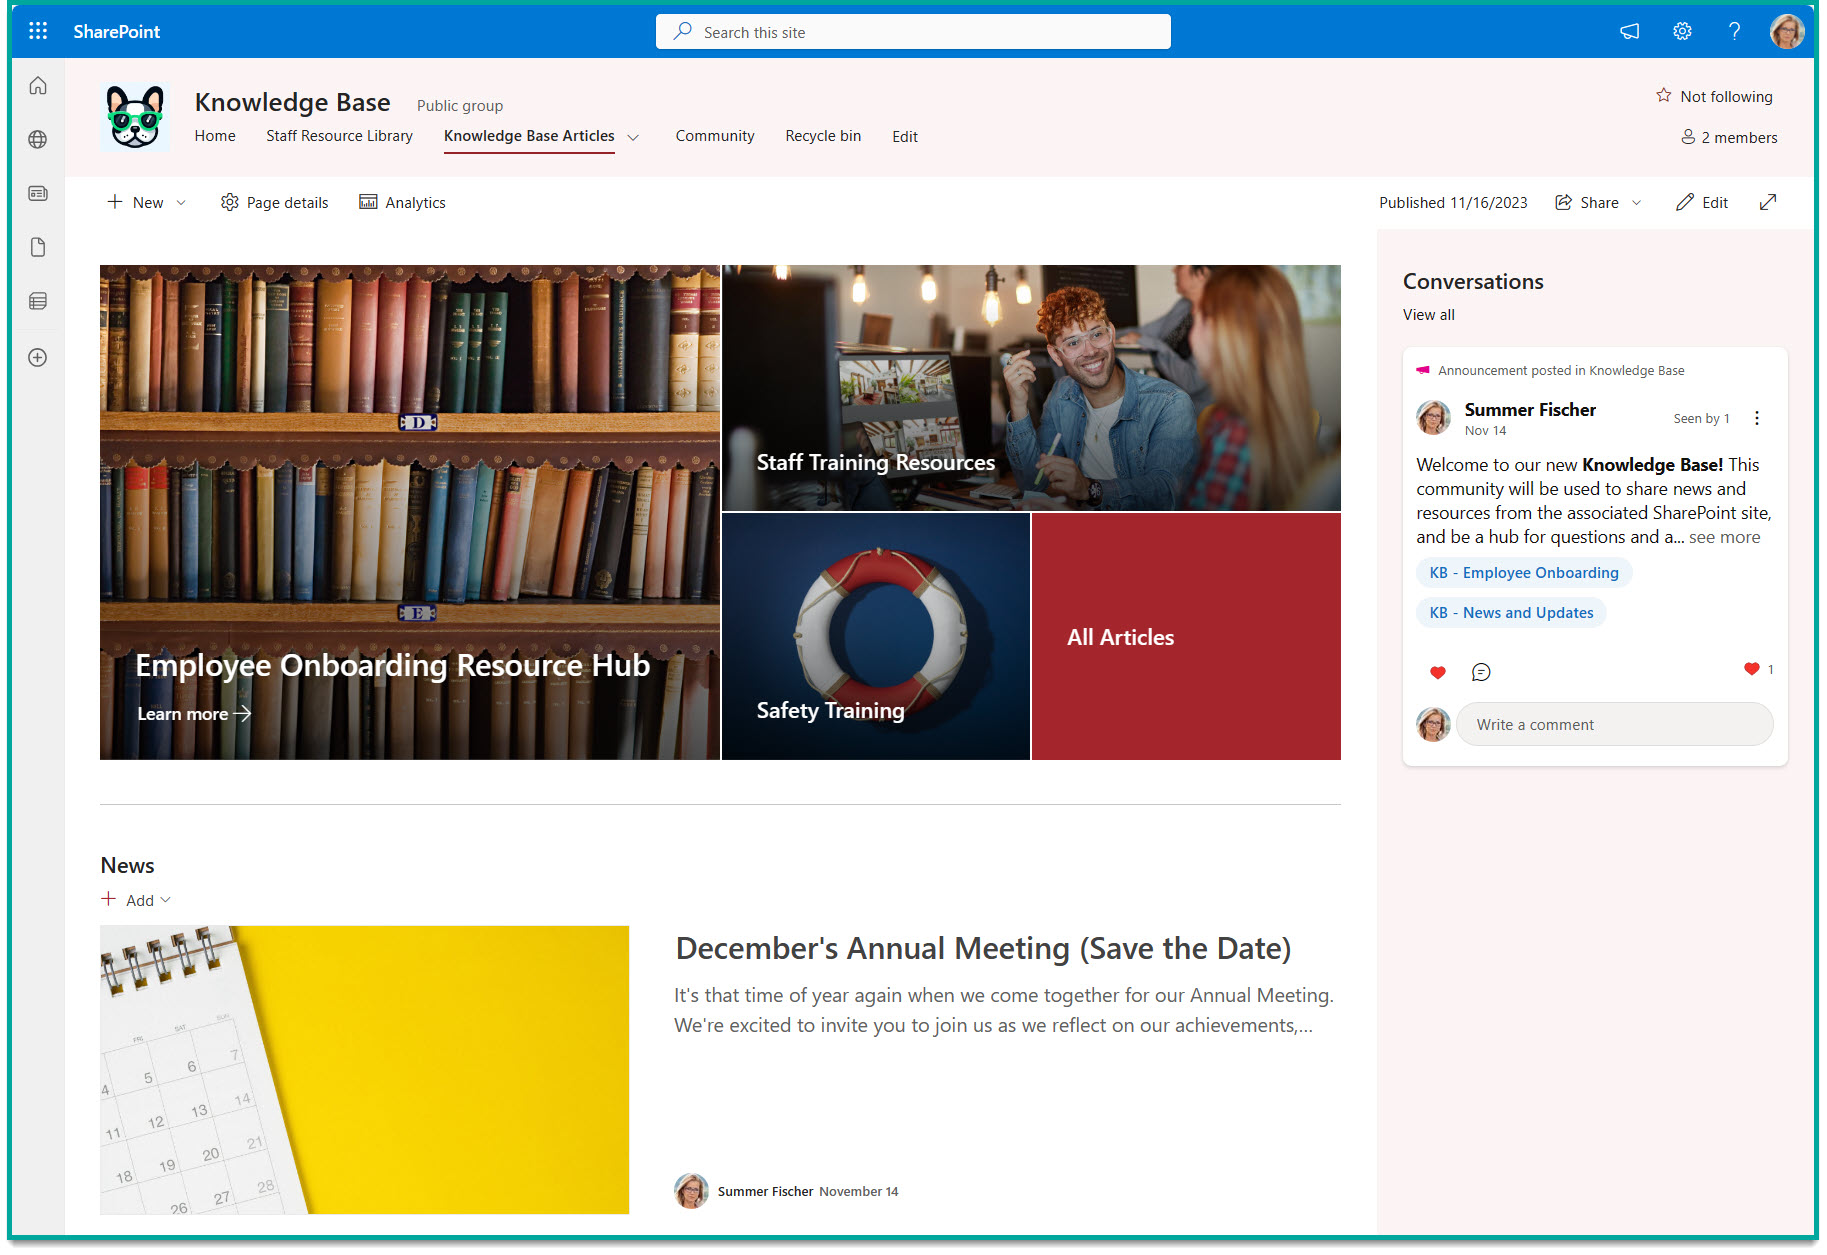
In my test build, I moved the navigation to the top of the page and fleshed it out to make sure it was easy for site visitors to find key pages and links to the community.
On the page itself, I added a HERO web part to direct new site visitors to the most popular resources. The HERO can only hold up to six links, so choose what you're going to feature here carefully and get lots of feedback.
Lastly, I have the 'Conversations' web part included on the side. Because this is the home page, I configured it to filter for posts that have the "KB - News and Updates" topic. People won't be able to create NEW posts with this configuration, but they can react and reply to the existing posts shown here.
Remember who the customer is here. It's not your stakeholders, executives or any one person in the project - you're building this for EVERYONE. Make sure finding the content they need NOW is fast and easy, or they may not come back.
Also, add this site to your SharePoint hub if you have one!
The Default 'Documents' Library
The default document library (called 'Documents') is connected to the community via the M365 group connection. Anytime someone uploads a file to the community, it will be stored here.
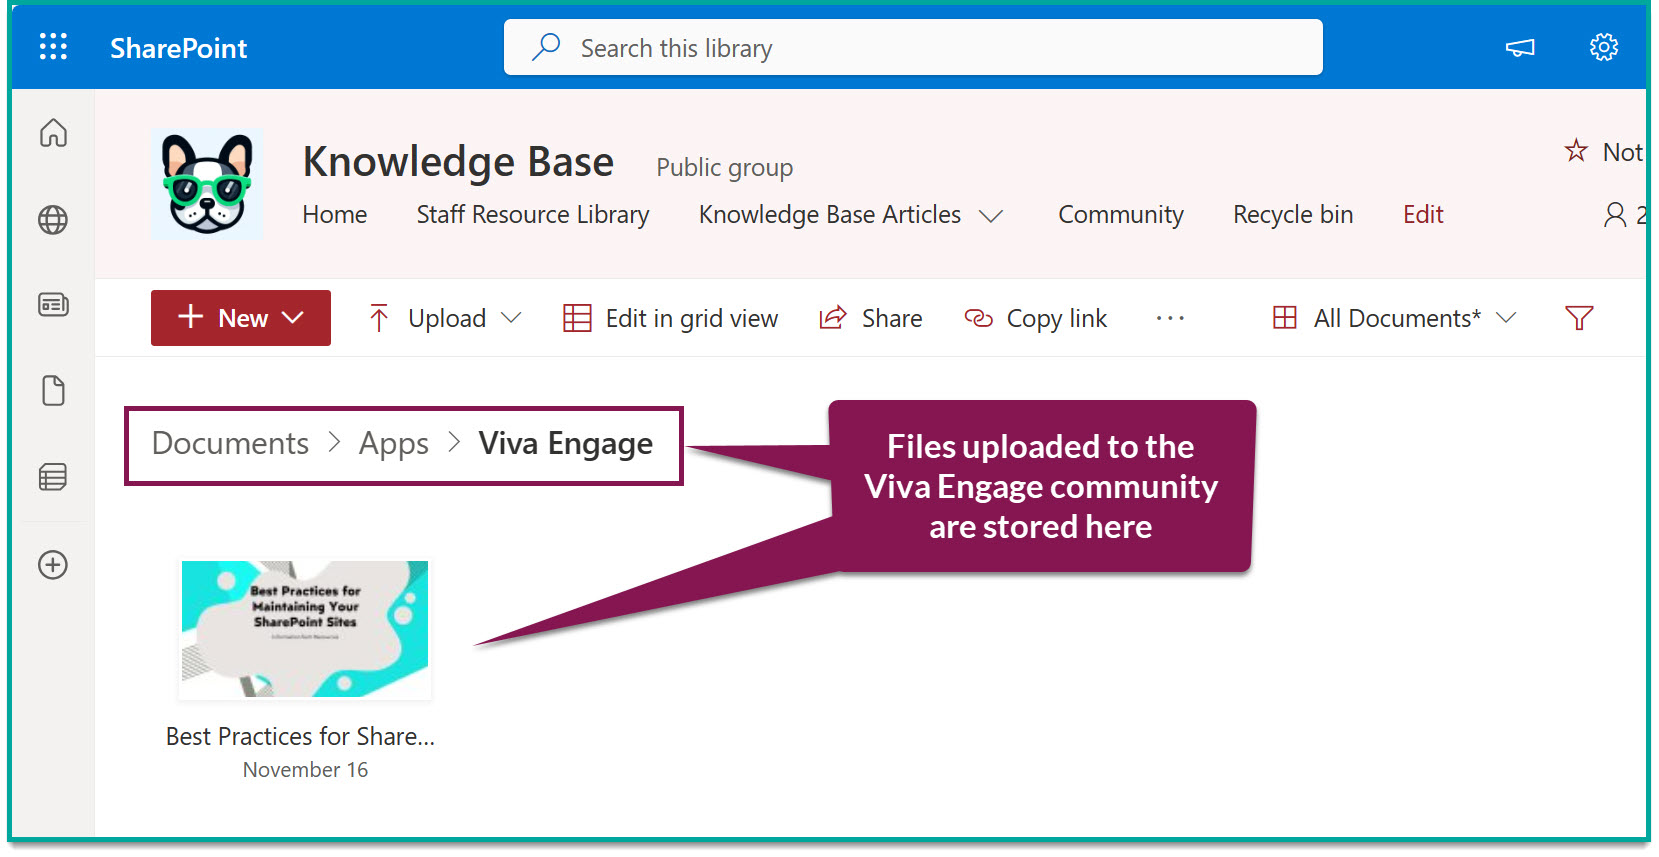
Because of this deep connection to the community, breaking the inherited permissions like I did with the 'Knowledge Base' library is unadvisable.mInstead, I recommend leaving this library alone.
If valuable content IS uploaded and an SME wants it protected from accidental edits - copy it to the Knowledge Base library. Moving or deleting the file from 'Documents' can break the link in the community post.
That's it for the initial setup of the SharePoint site. Remember that it's okay to start small and rollout additional features over a period of time if you need to.
Step #4: Setup the Viva Engage Community

The Viva Engage communities are where champions and SMEs will engage with staff members. Okay, I swear that will be the last time I will make that terrible pun..
The Viva Engage community setup should be straightforward if you've already set up your site. The most important tool I'll cover here is the Viva Engage community topics.
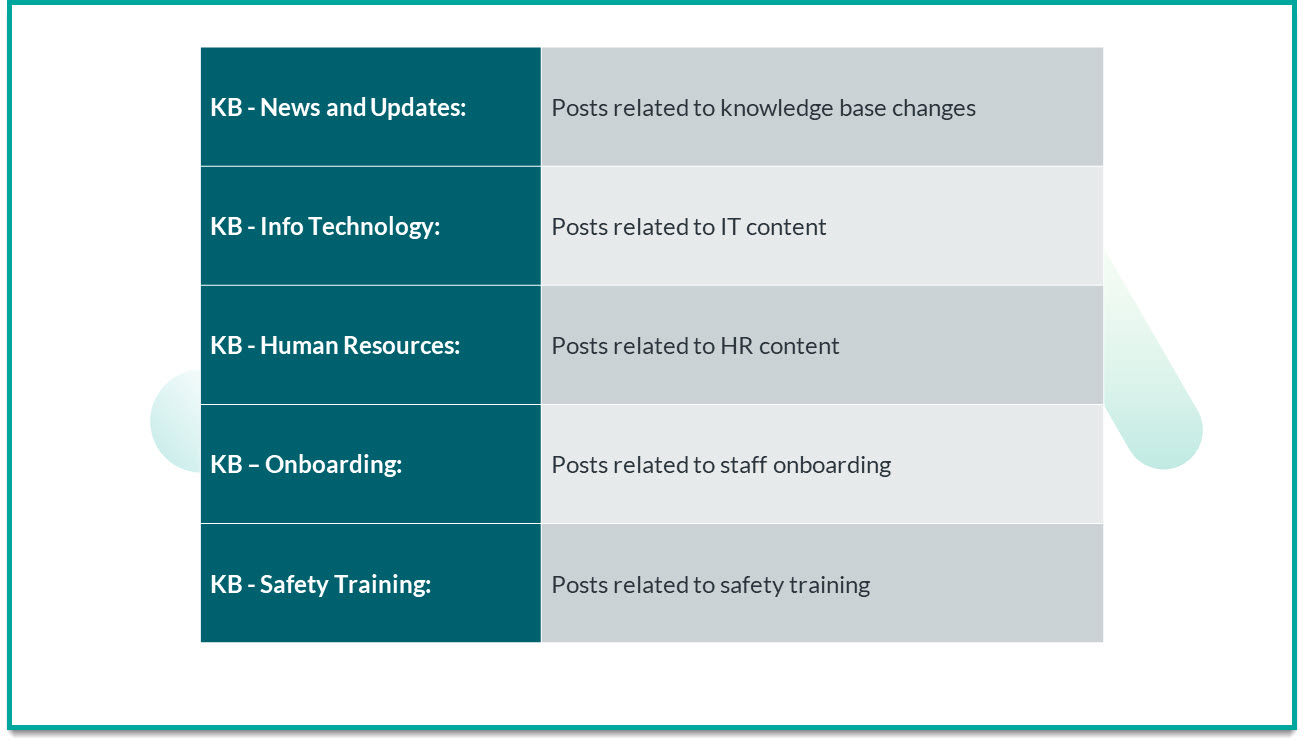
Community Topics in Viva Engage
If you're not familiar with topics in Viva Engage, this article will get you up to speed quickly.
Here is how I approached topics in my community:
Staff can choose to follow specific topics, so they get notified anytime someone uses them.
This can be especially helpful for SMEs who cannot regularly monitor the community for questions.
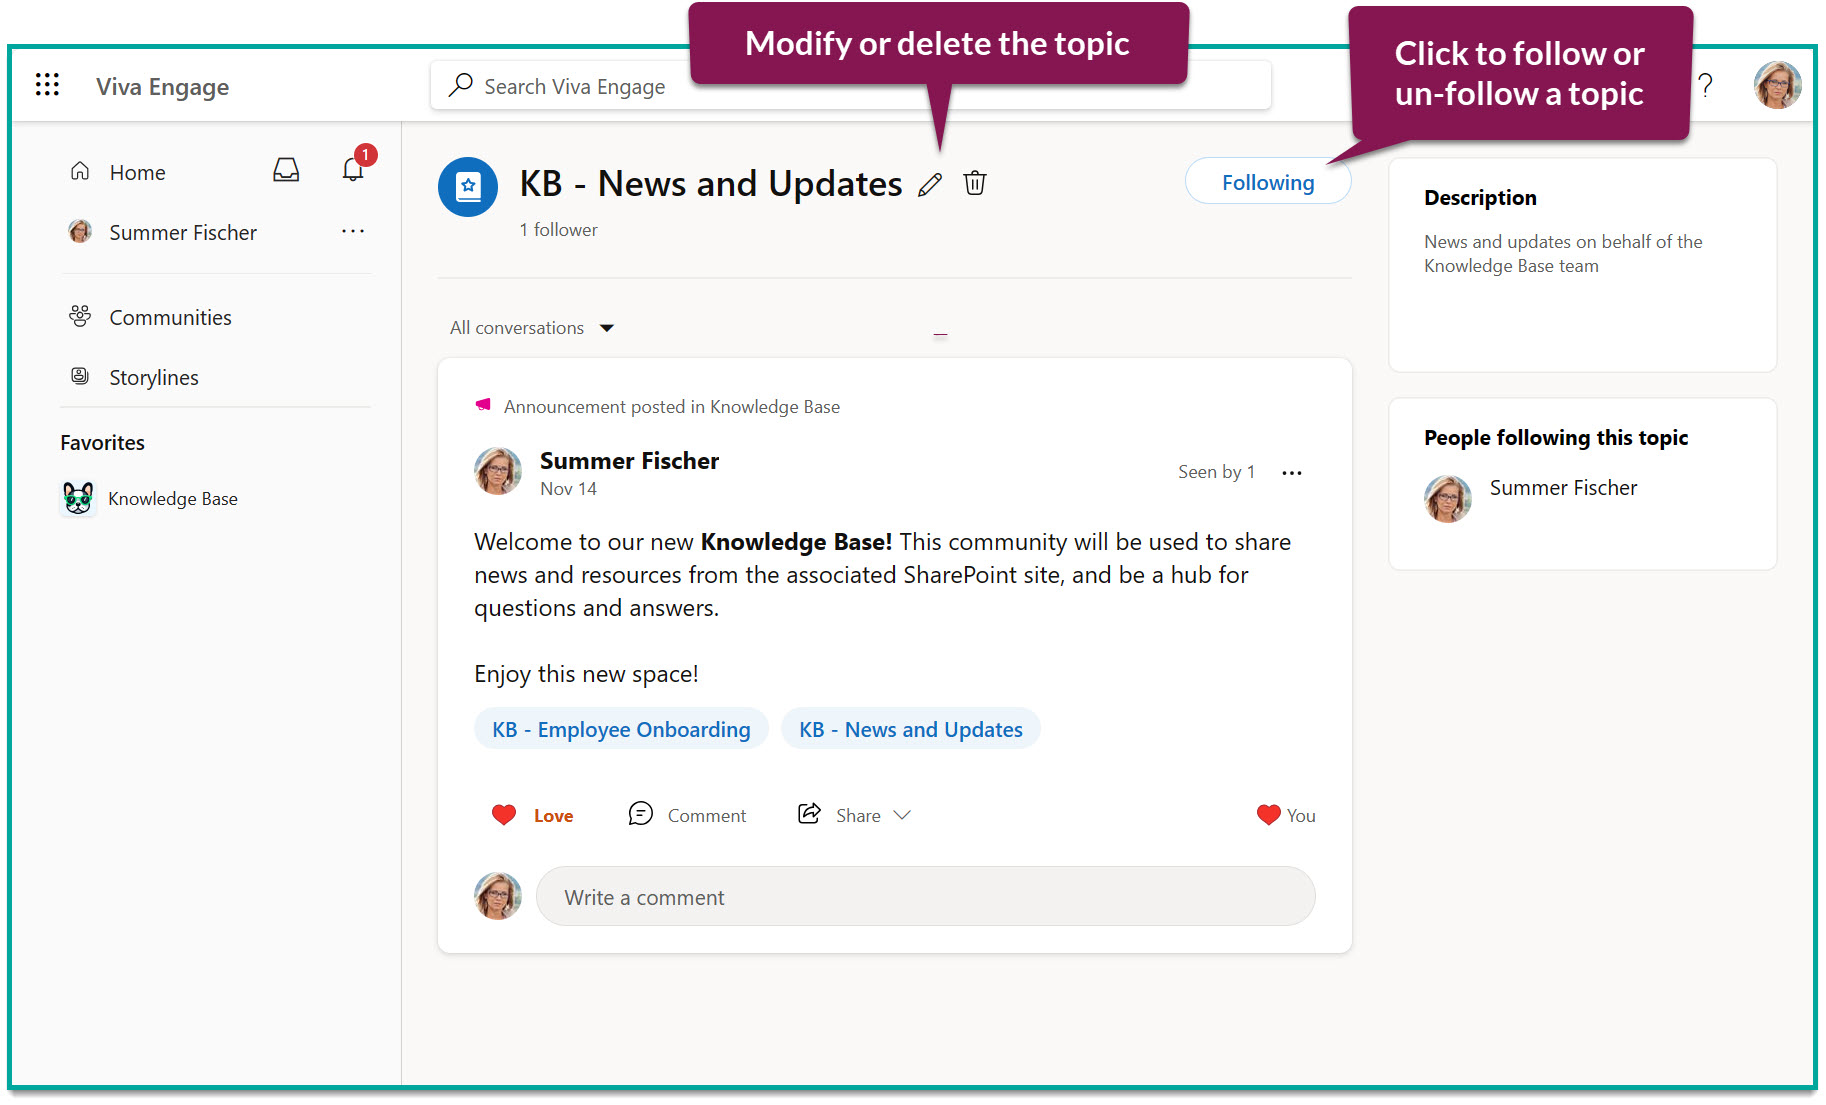
Since topics are shared across all communities in Viva Engage, I added the "KB" prefix to their names. This helps ensure that these topics are reserved for posts related to the knowledge base.
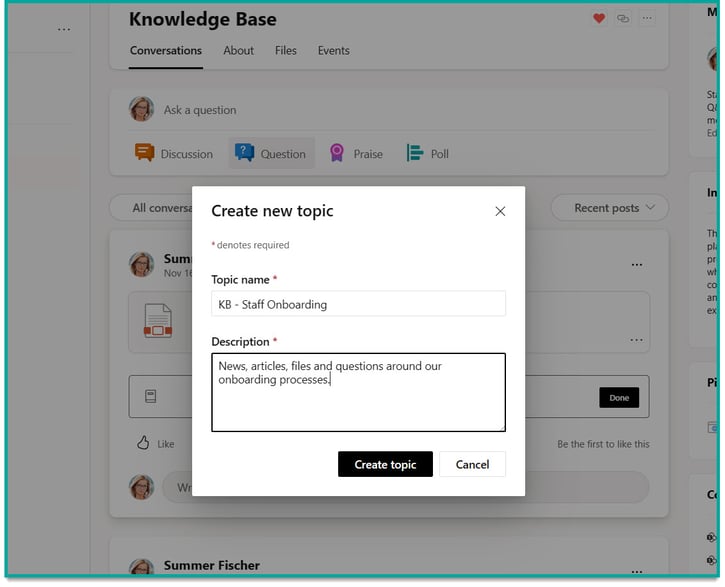
To determine what topics your community needs, you will need input from your champions, SMEs and staff members. When all it said and done, the champions should be the ones to own managing the community topics.
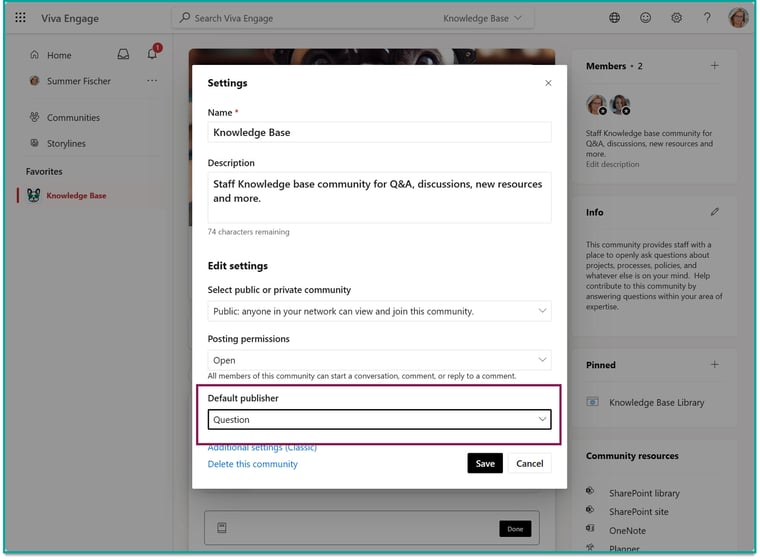
Set the Default Post Type to 'Question'
In my design, the community is primarily a Q&A space between staff and SMEs. If this setup works for you, you can set the default post type to 'Question'.
By setting the default to 'Question' - you're setting the precedent on how people should use the space. Of course, everyone can still create normal posts, polls, share links, etc.
The Q&A format also works well on the SharePoint site. With the 'Conversations' web part, we can make it easy for staff to ask questions as they navigate site articles.
Setup Pinned Links
If you have content on your SharePoint site setup, it will be easier to determine what links should be here. As an example, I included a link to the 'Knowledge Base' document library in my setup.
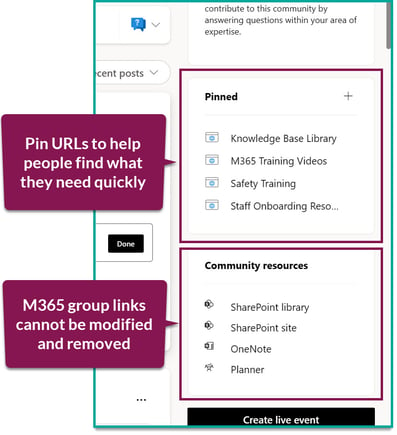
As a starting point, choose three things to add to this list that will help community visitors find what they're looking for. For example, an FAQ, Knowledge Base articles, documentation, etc.
Microsoft's documentation doesn't specify whether there's a maximum amount of URLs that can be pinned to a community, so you can add more over time.
Note: you cannot modify or remove the 'Community Resources' section at this time.
Viva Engage Community Banner, Logo and Description
These are the first things people will see when they first join the community. So while they're optional, I encourage you to spend a little time to customize the look and feel of your community.
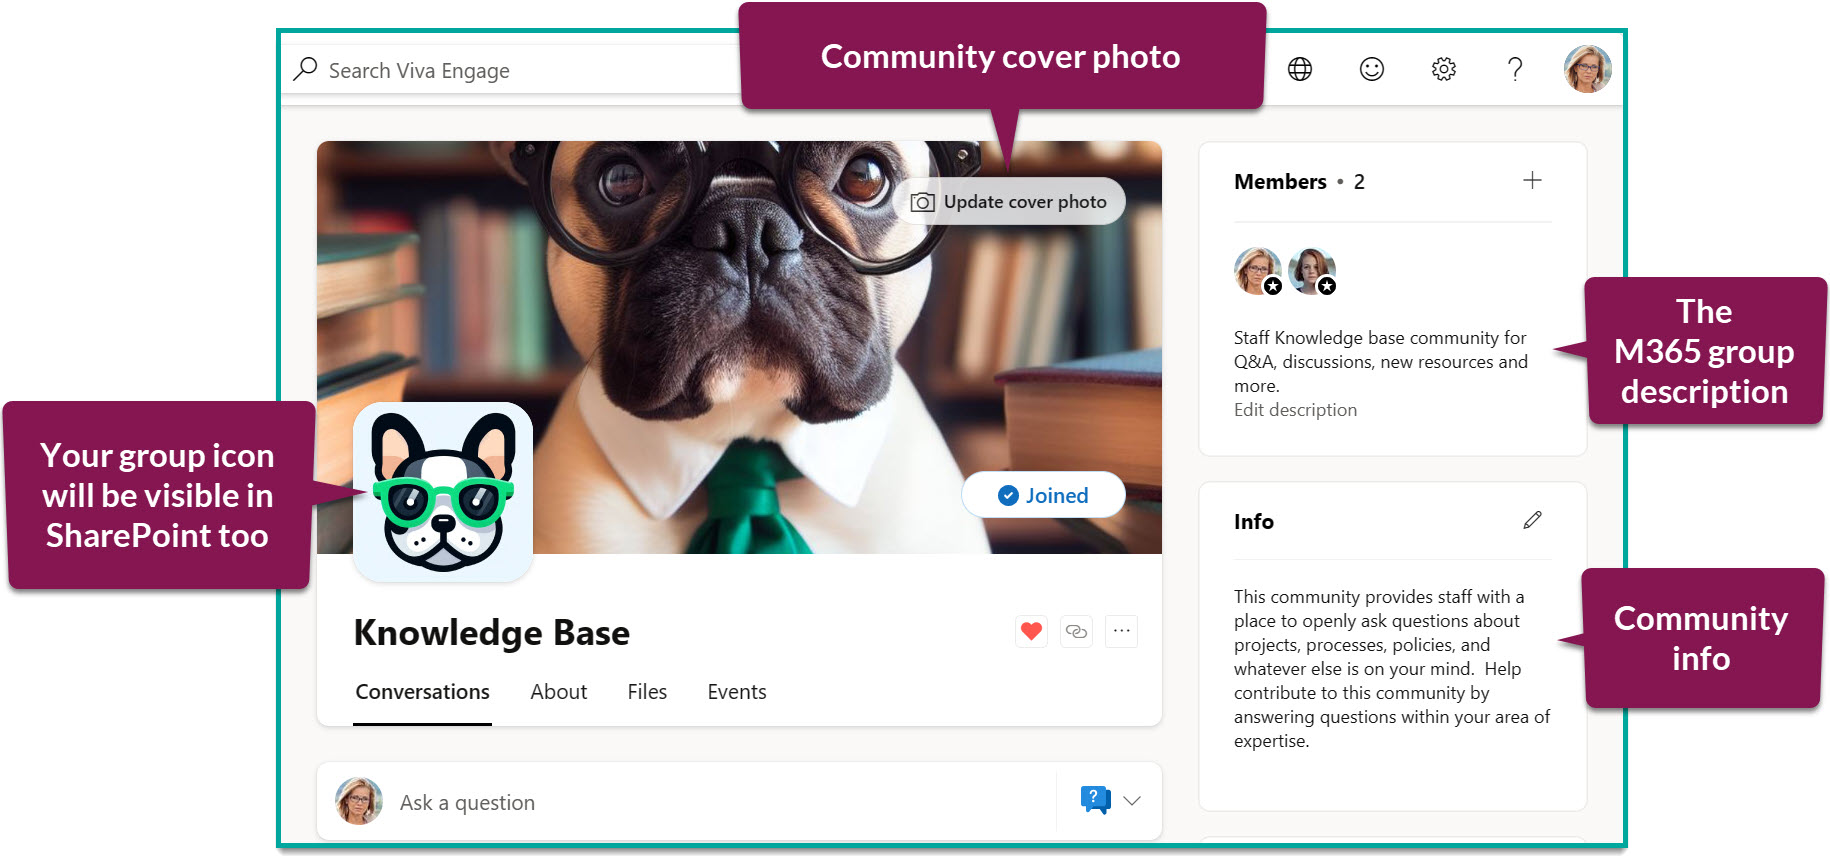
If you can, try using imagery that isn't just the company logo and branding. You're not advertising to anyone but the people who work for the company, and (in my own opinion) it rarely looks good unless you have awesome graphic designers. Have fun and give this space a personality of its own.
Don't forget to provide a good description in the 'Info' bucket so first-time visitors understand what this community is all about.
Step #5: Launch the Viva Engage Community
When your SharePoint site is setup with content, and your champions are ready to support the community - make the group public (if it's not already.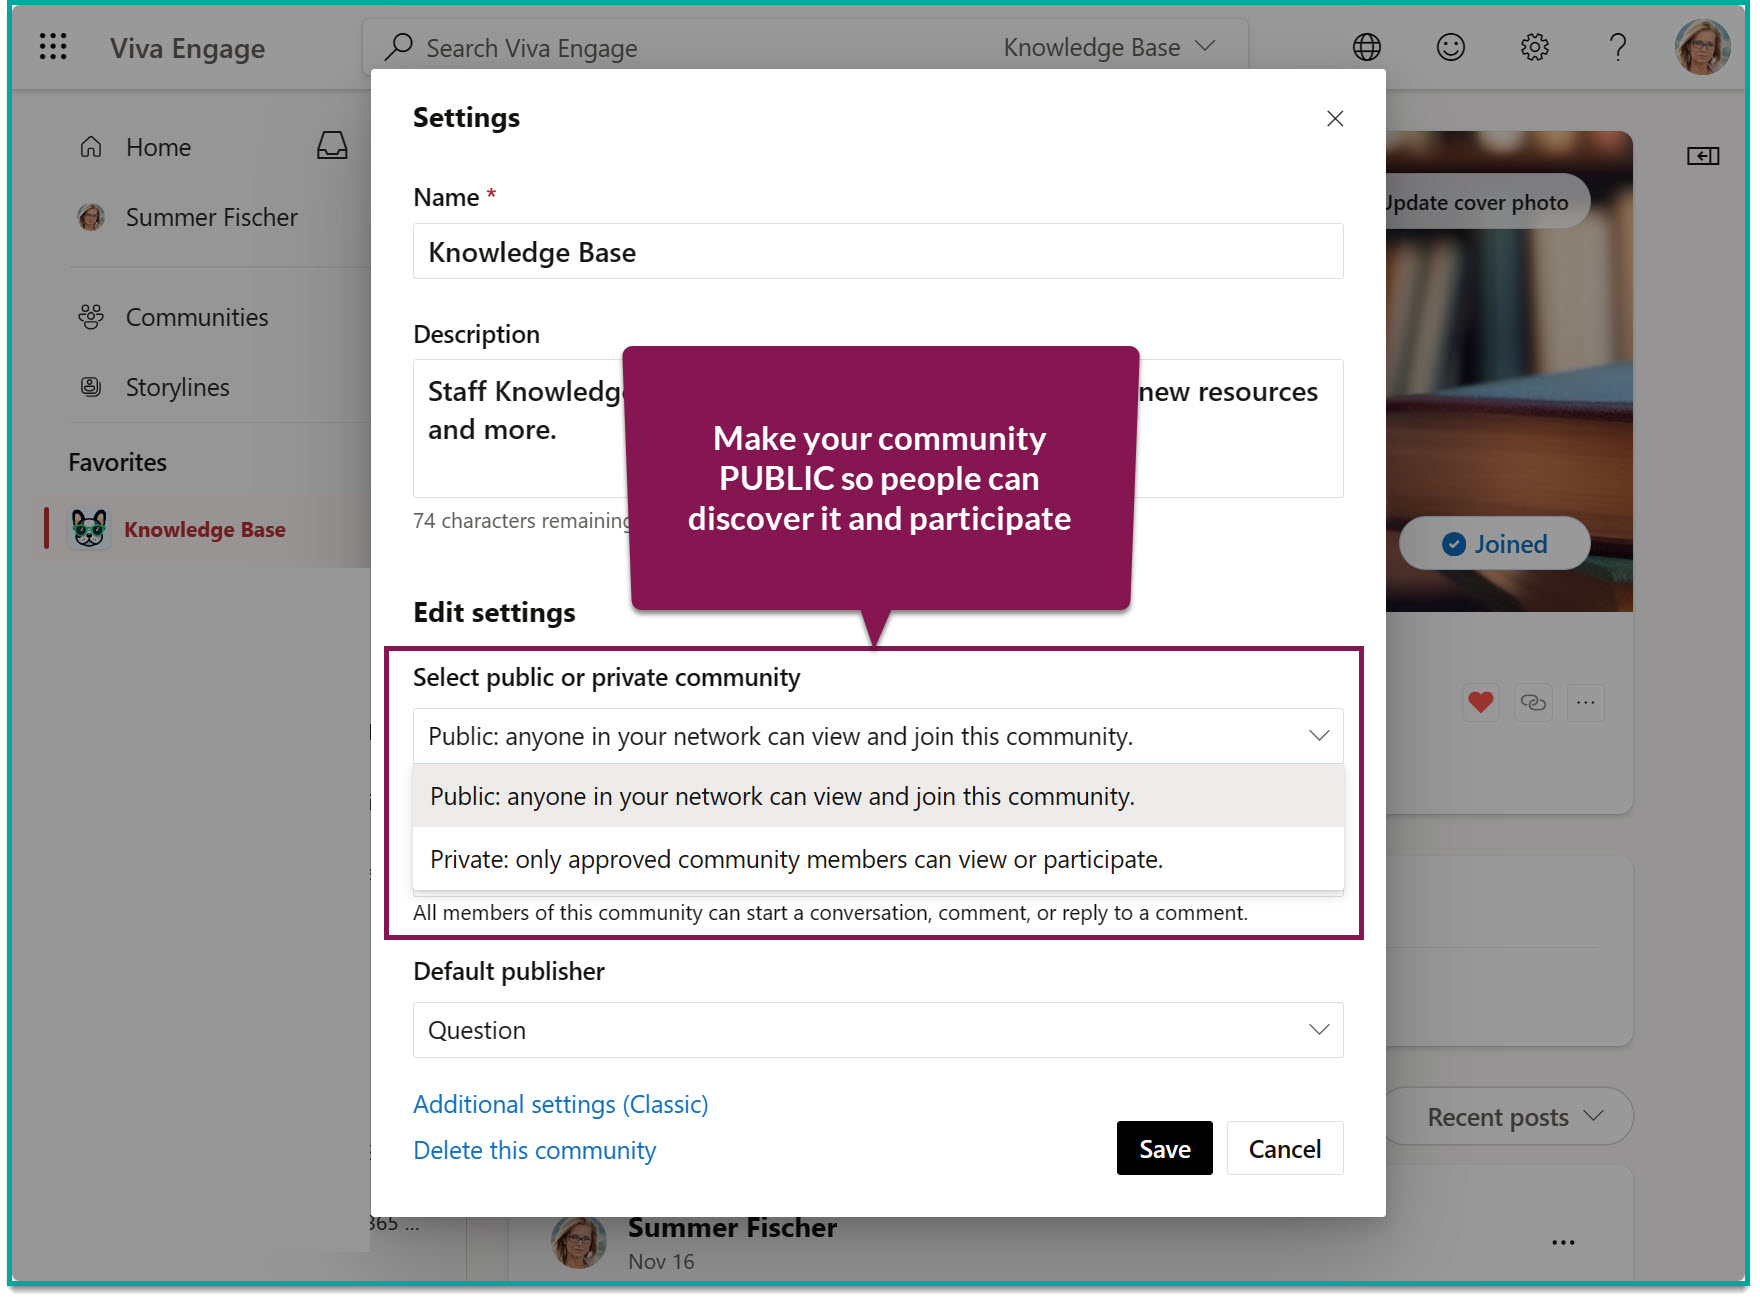
The rollout of your knowledge base will need support and time. People are busy with their jobs and it's unlikely that they will "come if you build it".
Work with your marketing team to come up with a plan to regularly promote the community and the site for a few months.
-
Promote new and revised knowledge base materials
-
Implement the knowledge base into staff onboarding
-
Encourage department SMEs to promote their content
Add the 'Conversations' web part to your SharePoint homesite
That's it! I hope this piece inspired you to give Viva Engage a closer look if you've never used it before!

Tag(s):
Viva Engage